
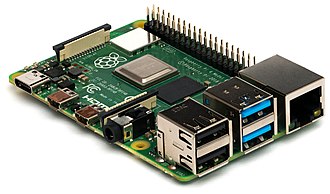
The Raspberry Pi is a versatile microcontroller that can do almost anything that a computer can. It uses Python programming and is a fantastic resource for learning about hardware hacking and coding. People use Raspberry Pi all across the world to develop programming skills, create hardware projects, home automation, leverage Edge computing and Kubernetes clusters, and even use them in industrial applications. Because of its inexpensive cost, versatility, and open design, it is frequently used in robotics and numerous fields including weather monitoring. Due to its support of the HDMI and USB standards, Raspberry Pi is a favourite for computer and electronic enthusiasts.
There are three series of Raspberry Pi, and several generations of each have been released.
-
Raspberry Pi
i) Raspberry Pi Model B
ii) Raspberry Pi Model A
iii) Raspberry Pi Model B+
iv) Raspberry Pi 2
v) Raspberry Pi 3 Model B vi) Raspberry Pi 3 Model B+
vii) Raspberry Pi 4 Model B
viii) Raspberry Pi 400 -
Raspberry Pi Zero
i) Raspberry Pi Zero
ii) Raspberry Pi Zero v1.3
iii) Raspberry Pi Zero W
iv) Raspberry Pi Zero WH
v) Raspberry Pi Zero 2 W -
Raspberry Pi Pico
i) Raspberry Pi Pico
ii) Raspberry Pi Pico W
There are various Raspberry Pi models, however for the majority of users, Raspberry Pi 4 Model B is the best option. The newest, fastest, and most user-friendly model is the Raspberry Pi 4 Model B. RAM options for the Raspberry Pi 4 are 2GB, 4GB, or 8GB. 2GB is sufficient for the majority of educational and hobbyist projects, as well as for use as a desktop computer.


A high-performance 64-bit quad-core processor, hardware video decoding at up to 4Kp60, dual-display support at resolutions up to 4K via a pair of micro-HDMI ports, up to 4GB of RAM, dual-band 2.4/5.0 GHz wireless LAN, Bluetooth 5.0, Gigabit Ethernet, USB 3.0, and PoE capability are some of its key features.
For portable applications like robots, Raspberry Pi Zero, Raspberry Pi Zero W, and Raspberry Pi Zero WH are advantageous because they are smaller and use less power. Generally speaking, it's simpler to start a project using a Raspberry Pi 4 and switch to a Raspberry Pi Zero after you have a functional prototype.
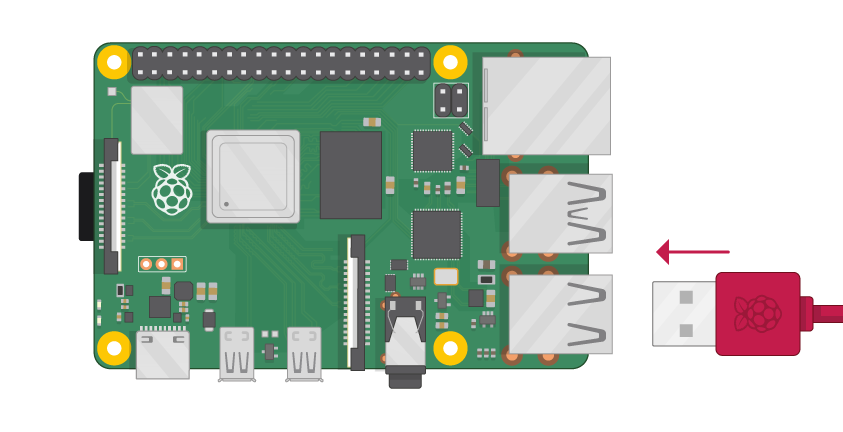
All Raspberry Pi models contain a USB port (the same one seen on many cell phones) to connect to a power outlet: either a USB-C connection for the Raspberry Pi 4 or a micro USB port for the Raspberry Pi 3, 2, and 1.
Power Supply
We need a power supply that provides :-
- At least 3.0A for Raspberry Pi 4.
- At least 2.5A for Raspberry Pi 3.
Storage
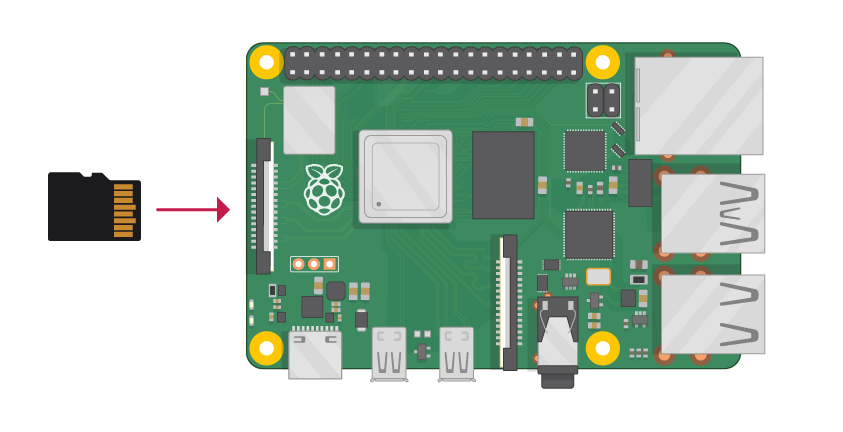
To store all of its files including the Raspberry Pi OS operating system, our Raspberry Pi needs an SD card. We need a microSD card with a capacity of at least 8GB. For the Raspberry Pi, many vendors offer SD cards that are pre-installed with the operating system and ready to use.
Input Peripherals
We require a USB keyboard and mouse in order to utilise your Raspberry Pi. A USB keyboard and mouse are required for the initial setup before we may use a Bluetooth keyboard and mouse with our Raspberry Pi.
Output Peripherals
We need a screen and a cable to connect the screen and our Raspberry Pi in order to display the Raspberry Pi OS desktop environment. The display could be a computer or television screen. Raspberry Pi may use the screen's built-in speakers to play music if they are present.
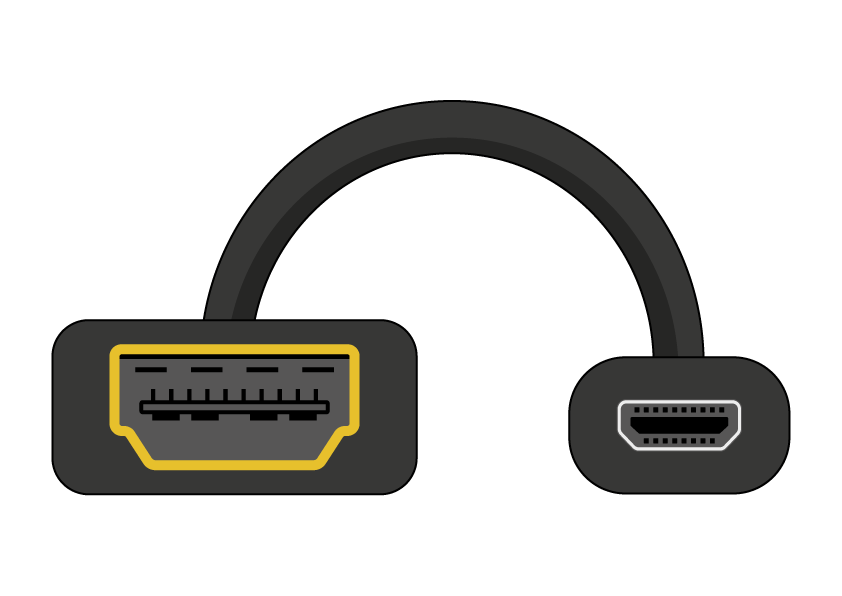
The HDMI output port on our Raspberry Pi is compatible with the HDMI ports on the majority of contemporary TVs and computer monitors. DVI or VGA connectors are also frequently found on computer monitors. We may connect two different monitors to the Raspberry Pi 4 thanks to its two tiny HDMI connectors. To connect Raspberry Pi 4 to a screen, we need either a micro HDMI to HDMI cable or a normal HDMI to HDMI cable combined with a tiny HDMI to HDMI adapter. We may use a typical HDMI to HDMI connection to connect the Raspberry Pi 1, 2, and 3 to a screen because each of them has a single full-size HDMI port.
An HDMI to DVI cable can be used to connect our Raspberry Pi to our screen if it has a DVI connector.

Some screens only have a VGA port. We can use an HDMI to VGA converter to connect our Raspberry Pi to such a display.

Internet
For connecting to the internet, the larger Raspberry Pi models (but not the Raspberry Pi Zero or Raspberry Pi Zero W) feature a conventional Ethernet connector; the Raspberry Pi Zero requires a USB to Ethernet adaptor. Wireless internet access is also available for Raspberry Pi Zero W, Raspberry Pi 3, and Raspberry Pi 4.
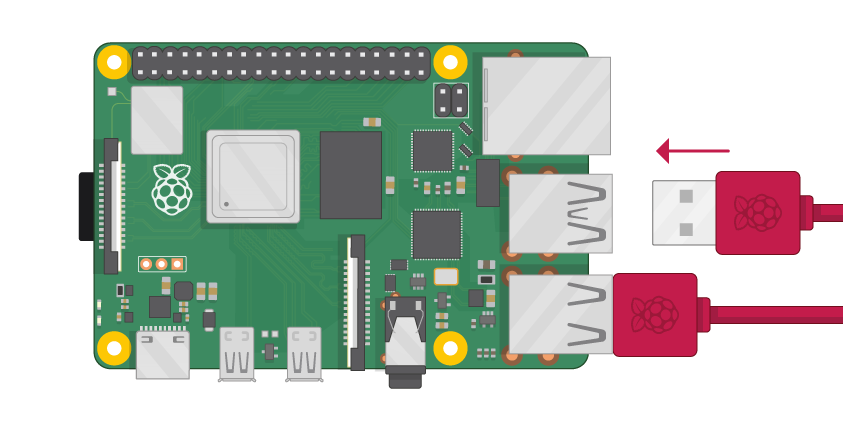
- Connect everything to our Raspberry Pi at this time. To ensure the safety of all our components, it is crucial to complete these steps in the proper order.
- Insert the SD card we have set up with Raspberry Pi OS into the microSD card slot on the underside of our Raspberry Pi. Many microSD cards come inside a larger adapter — we can slide the smaller card out using the lip at the bottom.

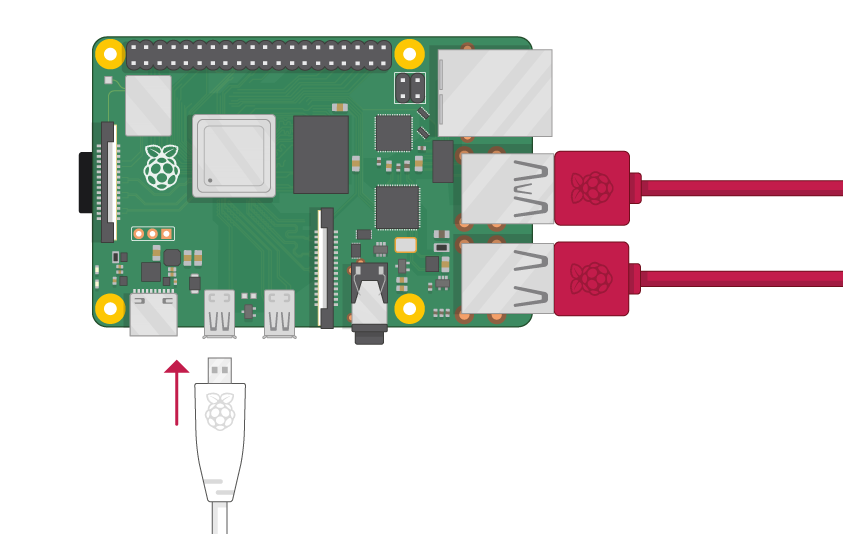
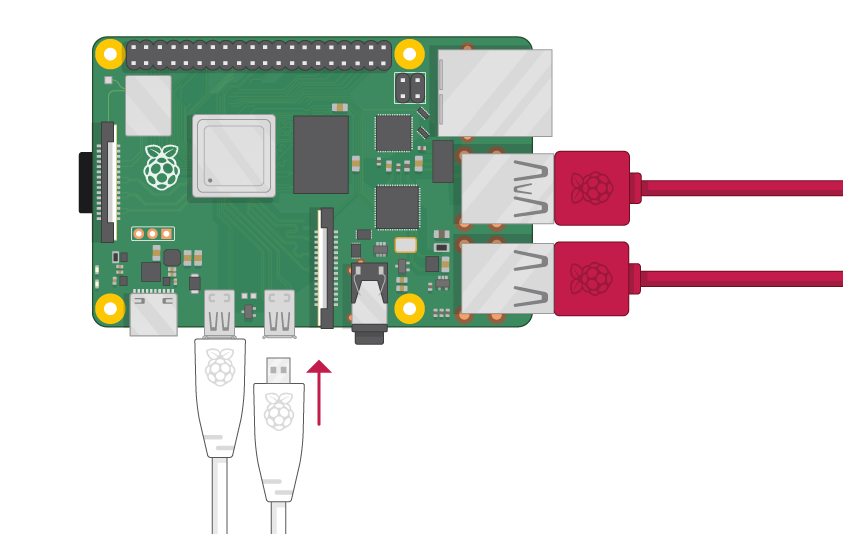
- It doesn't matter which port we choose; just locate the USB connection end of the mouse's cable and attach the mouse to the Raspberry Pi.
- Connect the keyboard in the same way.
- Make sure our screen is plugged into a wall socket and switched on.
- Look at our Raspberry Pi's HDMI port(s); we'll see that they have a flat surface on top.
- Use a cable to connect the screen to Raspberry Pi’s HDMI port — use an adapter if necessary.
Raspberry Pi 4
Use HDMI0, the first HDMI port on the Raspberry Pi 4, to connect our display. Use HDMI0 instead of HDMI1 (which is closest to the power in port).
We can connect an optional second screen in the same way.
Raspberry Pi 1,2,3
Connect the screen to the single HDMI port.

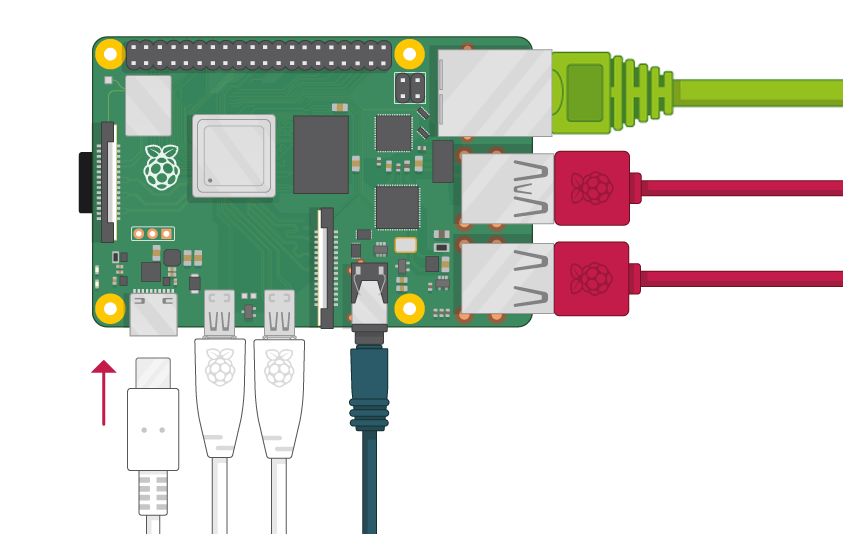
Utilise an Ethernet cable to connect the Raspberry Pi's Ethernet port to an Ethernet socket on the wall or on our internet router if we wish to use Ethernet to connect our Raspberry Pi to the internet. If we wish to connect to the internet or use wireless connectivity, we don't need to do anything.
Sound will be played through the speakers on the screen if they are present. If we'd rather, we can also attach speakers or headphones to the audio port.

We can't turn on or off our Raspberry Pi. It will switch on as soon as we plug it into a power source. Plug the power supply into a socket and connect it to our Raspberry Pi’s power port. We should see a red LED light up on the Raspberry Pi, which indicates that Raspberry Pi is connected to power.
Now let us head toward a Raspberry Pi project for beginners (and gamers), without any complex programming!
What do we require?
- Raspberry Pi 3 / Raspberry Pi 4 and power cable
- Ethernet cable
- 16GB or larger microSD card
Would you like to play Minecraft at your own pace? Create your own worlds, set up your own server, and even build in them with family and friends?
It’s remarkable that we can do all of these on a Raspberry Pi.
This can be done with previous Pi models, but the outcomes aren't as nice. It should be noted that since an Ethernet cable is faster than Wi-Fi, it is advised. Wireless networking is an option, however a faster connection results in greater server performance and better game performance.
All the above, when used with a remote SSH connection, will let us set up a Minecraft server on your Raspberry Pi. If SSH isn't an option, you will also need :-
- USB keyboard
- USB mouse (or a combination of both)
- 1 x HDMI cable
- A monitor or other compatible display
Connect these peripherals before powering on the Raspberry Pi.
Of course, we'll also need Minecraft installed on our PC. We should be aware that the Raspberry Pi's system requirements prevent us from hosting a large number of guests. It should not be attempted to host more than 10 users on the Pi 3. Depending on the RAM we choose, a Raspberry Pi 4 Minecraft server can accommodate more players.
Learning how to create a Minecraft server on Raspberry Pi will give us a world that we can access from any device running Minecraft, except MinecraftPi. So, versions of Minecraft on a Windows PC, game console, Android, iOS, and Amazon Fire tablets and TV devices will work with this server. In short, we’ll need the main Minecraft open world game from Mojang.
Step 1: Install Raspberry Pi OS and configure our Pi
Let us start off with Raspberry Pi OS on our PC / laptop. The latest version can be found at
https://www.raspberrypi.com/software/operating-systems/. For speed we can use the Raspberry Pi Imager tool to write the Raspberry Pi OS image to our microSD card. Next, configure the Raspberry Pi OS environment for running the Minecraft server. If the monitor and keyboard is already set up, simply open the Raspberry Pi Configuration tool in the Preferences menu on the desktop.
(Refer here on how to install Raspberry Pi OS on your PC - https://projects.raspberrypi.org/en/projects/install-raspberry-pi-desktop/0)
If we're accessing via SSH, use sudo raspi-config to open the text-based configuration tool.
Here, the following changes should be made :-
- Go to Advanced Options > Memory Split and change the setting to 16MB. This will free more memory resources for the server.
- Next, go to Boot Options > Desktop/CLI and select Console. (No need to do this on Raspberry Pi OS Lite)
- Enable SSH in Advanced Options > SSH.
- Finally, go to Advanced > Expand Filesystem.
With these changes made, go to Finish and reboot Raspberry Pi OS at the prompt. Once done, login again, and find the IP address of the device with :-
sudo hostname - (or) ifconfig
Make a note of the IP address before continuing.
Step 2: Install the Minecraft Server on Raspberry Pi
Installing Minecraft on the Raspberry Pi relies on the Nukkit server software from Cloudburst. Developed specifically for Minecraft: Pocket Edition, Nukkit can be easily installed on the Pi via the command line.
Start by installing Java. This is required for Nukkit to run:
sudo apt install oracle-java8-jdk
Next create a new directory (labelled "nukkit") then open it:
mkdir nukkit
cd nukkit
With that done, download the Nukkit server software. Be sure to enter this accurately - it's easier to copy and paste into an SSH session.
wget -0 nukkit.jar https://ci.opencollab.dev/job/NukkitX/job/Nukkit/job/master/lastSuccessfulBuild/artifact/target/nukkit-1.0-SNAPSHOT.jar
(The most up-to-date builds can be found at https://ci.opencollab.dev/job/NukkitX/job/Nukkit/job/master/)
Once downloaded, run Nukkit :-
sudo java -jar nukkit.jar
This prompts Nukkit to set up the server. When prompted, choose the language (for example, eng) then watch as the Minecraft server is generated.
Step 3: Configure our Minecraft Raspberry Pi Server
It's time to configure the Minecraft server after we are certain that it is set up successfully. Nukkit comes with server.properties and nukkit.yml configuration files. To edit these, simply open them in your preferred text editor. On Raspberry Pi OS, nano is preinstalled, so use :-
sudo nano nukkit.yml (or) sudo nano server.properties
Various changes are recommended. Whatever we change here, we should keep in mind that even the Raspberry Pi 4 is a modest device that cannot handle too much processing.
List of server properties can be found in https://minecraft.fandom.com/wiki/Server.properties.
Start off with :-
max-players=10
For player vs. player option :-
pvp=on
There is also a difficulty setting (here the easiest setting is 0) :-
difficulty=1
When we’re done, press Ctrl+X to save and exit, then run :-
sudo java -jar nukkit.jar
This will restart the Minecraft Server, but not the Raspberry Pi.
Step 4: Connect to the Raspberry Pi Minecraft Server
Your local network's Minecraft server should now be operational. Using the IP address you earlier noted down, check this using the ping command from another device. You're good to go as long as your Raspberry Pi responds to the ping.
All you need to do is launch Minecraft on your computer or tablet, then :-
- Click Play > Servers.
- Select Add Server.
- Input new server details (name, IP address).
- Ensure the port number matches the one listed in the server properties.
If our Raspberry Pi Minecraft server is running and online, it should be listed as an option to connect to. Simply select the server to start playing.

Step 5: Extend the Minecraft Server functions with Nukkit plugins
The default configurations for the Nukkit server might not be wholly to our liking. Tweaking nukkit.yml and server.properties is one option, but will only get us so far. Plugins have been developed for Nukkit that allow us to enhance the basic gameplay. This adds features to the online session that have been omitted, such as the inclusion of animals.
Suggested Nukkit plugins include :-
- MobPlugin: adds mobs and animals to the Minecraft environment.
- WorldEssentials: enables different game modes.
- EssentialsNK: includes additional game modes, multiplayer management tools, etc.
These plugins are compatible with a Minecraft server on Raspberry Pi 3 and 4 and can be installed simply by downloading to our Pi and copying the file to the plugins directory.
For example, the MobPlugin can be moved with :-
sudo mv MobPlugin-1.9.0.1.jar plugins
Head to the Cloudburst website and click Resources to choose from over 250 plugins for our Raspberry Pi Minecraft Server.
We have created our very own Minecraft game server running on our Raspberry Pi. If we leave it up and running, we'll have an always-on Minecraft world that we can connect to and use!
A PIR sensor is a simple but excellent device for detecting when motion has occurred. These sensors were frequently employed in security systems of a bygone era. Every time motion is detected, a piezo speaker will also be activated. For both of these devices to function, the GPIO pins must be connected.
What do we require?
- Raspberry Pi
- MicroSD Card
- PIR Sensor
- Piezo Speaker
- 100 Ohm Resistor
- Breadboard
- Jumper Wires
Hardware Setup
We will be putting together a simple circuit that makes use of a PIR sensor and also a piezo speaker.
The majority of PIR sensors contain a few movable screws that can be used to change the sensors' timing and sensitivity. We can specify a delay before it goes off using the time (send a high signal). (Approximately 2-4 seconds) The sensitivity determines how much movement is required before it activates.
A simple speaker, the piezo buzzer produces sound anytime a current passes through it. In this circuit, whenever the motion detector circuit is triggered, the buzzer will emit a loud beep.

To consruct the circuit, follow these steps :-
- Run a ground pin to the ground rail on the breadboard.
- Run a 5v pin to the positive rail on the breadboard.
- Connect the piezo buzzer to pin 7 (Red wire) and the ground rail (Black wire).
- Run a wire from pin 11 to the breadboard. Place a 100-ohm resistor at the end of the wire. Then connect this up to the yellow wire of the PIR sensor.
- Now for the PIR sensor run the red wire to the 5v line and the black wire to the ground rail on the breadboard.
Software Setup
We will need to do a little programming to activate our Raspberry Pi Motion sensor circuit. Similar to our introduction to the Raspberry Pi GPIO pins, this programming is really simple, making it a great way to learn Python fundamentals.
We import the GPIO and time Python packages as we will need these to be able to interact with the GPIO pins and also pause our script. We set three variables, the first two are references to our pins, and thus named appropriately. The current state variable is where we will store our sensor state. If this is 0, then it is off, or 1 means it has been activated. We will set our GPIO mode to reference the physical numbering of the pins rather than the actual numbering. We also set up our GPIO pins to be either outputs or inputs.
In the next part, we have an infinite while loop. We begin by putting the script to sleep for 0.1 seconds. After this, we get the current state of the sensor, and if it is 1 (e.g. detected motion), then we run the code inside the if statement. If it isn’t 1, then we continue to loop continually checking the sensor. The code in the if statement sends the piezo buzzer to high that should emit a noise. The script will do this for a second then turn the buzzer off. After this, it will wait for another 5 seconds before exiting the if statement and then rechecking the Raspberry Pi PIR sensor.
We have also nested out code within a try, except, finally block. We have added this because we will need to use the keyboard to stop the script. It is also very important that we run GPIO.cleanup() to ensure our script cleans up nicely. The try, except, finally code allows us to do this.
Code

Run the script.
Moving in front of the Raspberry Pi PIR sensor should activate the piezo buzzer and cause it to make noise.
Find more project tutorials here.
https://www.raspberrypi.org/help/
https://www.seeedstudio.com/blog/2019/09/29/top-20-best-raspberry-pi-4-projects-that-you-must-try-now/
https://www.makeuseof.com/tag/10-raspberry-pi-projects-beginners/